Introduction
How to create a squid/privoxy/tor configuration to enhance the web browsing experience.
This setup is made of several components:
- FireHOL is a Linux Firewall Configurator. This is my favorite, simple and efficient.
- Pi-hole is a DNS relay (based on dnsmasq) that allows to block DNS requests based on domains blacklists (useful to avoid ads).
- Tor is a free software and an open network that helps you defend against traffic analysis, a form of network surveillance that threatens personal freedom and privacy, confidential business activities and relationships, and state security.
- Privoxy is a non-caching web proxy with advanced filtering capabilities for enhancing privacy, modifying web page data and HTTP headers, controlling access, and removing ads and other obnoxious Internet junk.
- Squid is a caching proxy for the Web supporting HTTP, HTTPS, FTP, and more. It reduces bandwidth and improves response times by caching and reusing frequently-requested web pages.
- NordVPN is a great VPN service provider. Here I just use the proxy access
In my context:
- Squid is used for caching
- Privoxy is used for privacy
- Tor is used for more privacy (anonymity)
- NordVPN is used for more privacy (anonymity) [optional]
- Pi-Hole is used for adblocking (DNS Level)
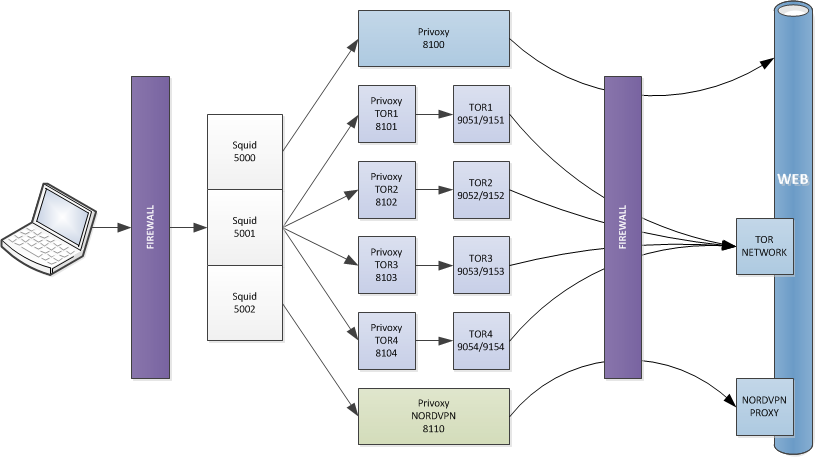
The idea is to create one squid proxy instance, listening over ports 5000, 5001 and 5002. Each port will redirect the flow to the dedicated service.
- Port 5000 : Access through Privoxy only
- Port 5001 : Access through Privoxy and Tor (4 Instances)
- Port 5002 : Access through Privoxy and NordVPN Proxy
For this, I used a Raspberry Pi 3 running Raspbian.
Networking
- Disable bluetooth and Wifi, in
/boot/config.txtadd the following instructions:dtoverlay=pi3-disable-bt dtoverlay=pi3-disable-wifi - Disable ipv6, in
/etc/modprobe.d/ipv6.confadd the following instructions:alias net-pf-10 off alias ipv6 off options ipv6 disable_ipv6=1 blacklist ipv6 - Disable ipv6, in
/etc/sysctl.confadd the following instructions:net.ipv6.conf.default.disable_ipv6=1 net.ipv6.conf.all.disable_ipv6=1 - Disable ipv6, in
/boot/cmdline.txtadd the following instruction:ipv6.disable=1 - Configure static ip address, in
/etc/dhcpcd.confadd the following instructions (adapt with your own network configuration):static ip_address=192.168.1.X/24 static routers=192.168.1.1 static domain_name_servers=192.168.1.1
Firehol
- Install Firehol with:
apt install firehol - Enable the daemon, in
/etc/default/fireholmodify the following instruction:START_FIREHOL=YES - Configure the firewall, in
/etc/firehol/firehol.confadd the following instructions:version 6 server_tor_ports="tcp/9050 tcp/9051 tcp/9001 tcp/9030 tcp/4443 tcp/5228" client_tor_ports="default" server_proxy_ports="tcp/5000 tcp/5001 tcp/5002" client_proxy_ports="default" # interface eth0 world protection strong protection reverse strong client dns accept client http accept client https accept client ntp accept client ping accept client tor accept # server http accept server https accept server dns accept server ssh accept server ping accept server proxy accept
Pihole
- Install Pi-Hole with the official installation script:
curl -sSL https://install.pi-hole.net | bash
From now on, you can reconfigure your equipments to use this server as DNS server or change the DHCP Configuration to automatically push this server IP as DNS server.
Tor
- Install Tor with:
apt install --no-install-recommends tor - Disable the default tor service with:
systemctl stop tor.service systemctl disable tor@default.service systemctl mask tor@default.service - Configure the tor default configuration in
/usr/share/tor/tor-service-defaults-torrc-instances:DataDirectory /var/lib/tor-instances/@@NAME@@ PidFile /var/run/tor-instances/@@NAME@@/tor.pid RunAsDaemon 1 User _tor-@@NAME@@ SyslogIdentityTag @@NAME@@ # ControlSocket /var/run/tor-instances/@@NAME@@/control GroupWritable RelaxDirModeCheck SocksPort unix:/var/run/tor-instances/@@NAME@@/socks WorldWritable # CookieAuthentication 1 CookieAuthFileGroupReadable 1 CookieAuthFile /var/run/tor-instances/@@NAME@@/control.authcookie # Log notice syslog # SocksPolicy accept 127.0.0.1/32 SocksPolicy reject * CircuitBuildTimeout 30 NumEntryGuards 6 KeepalivePeriod 60 NewCircuitPeriod 15 - Create X Tor service accounts (Here 4):
for i in {1..4}; do useradd -d /var/lib/tor-instances/tor$i -U _tor-tor$i -m -r -s /bin/false; done # mkdir /etc/tor/instances mkdir /etc/tor/instances/tor{1..4} - Configure the X tor configurations in
/etc/tor/instances/torX/torrc:ControlPort 915X SocksPort 127.0.0.1:905X - Enable the X tor services:
systemctl enable tor@tor{1..4}.service
Privoxy
- Install Privoxy with:
apt install --no-install-recommends privoxy - Prepare directories for X privoxy services:
mkdir /var/log/privoxy/tor{1..4} chown privoxy:adm /var/log/privoxy/tor{1..4} - Configure the default privoxy configuration in
/etc/privoxy/config:user-manual /usr/share/doc/privoxy/user-manual confdir /etc/privoxy logdir /var/log/privoxy actionsfile match-all.action actionsfile default.action actionsfile user.action filterfile default.filter filterfile user.filter logfile privoxy.log listen-address 127.0.0.1:8100 toggle 1 enable-remote-toggle 0 enable-remote-http-toggle 0 enable-edit-actions 0 enforce-blocks 0 buffer-limit 4096 enable-proxy-authentication-forwarding 0 forwarded-connect-retries 0 accept-intercepted-requests 0 allow-cgi-request-crunching 0 split-large-forms 0 keep-alive-timeout 5 tolerate-pipelining 1 socket-timeout 300 - Prepare the X tor privoxy configurations:
cp /etc/privoxy/config /etc/privoxy/config_tor{1..4} - Configure the X tor privoxy configurations in
/etc/privoxy/config_torX:logdir /var/log/privoxy/torX hostname proxy_torX listen-address 127.0.0.1:810X forward-socks5t / 127.0.0.1:905X . - Prepare the VPN privoxy configuration:
cp /etc/privoxy/config /etc/privoxy/config_vpn - Configure the VPN privoxy configurations in
/etc/privoxy/config_vpn:logdir /var/log/privoxy/vpn hostname proxy_vpn listen-address 127.0.0.1:8110 enable-proxy-authentication-forwarding 1 forward / be64.nordvpn.com:80 - Prepare the X privoxy services:
cp /lib/systemd/system/privoxy.service /lib/systemd/system/privoxy_tor{1..4}.service - Configure the X privoxy services in
/lib/systemd/system/privoxy_torX.service:[Unit] Description=Privacy enhancing HTTP Proxy Documentation=man:privoxy(8) https://www.privoxy.org/user-manual/ After=network.target # [Service] Environment=PIDFILE=/var/run/privoxy_torX.pid Environment=OWNER=privoxy Environment=CONFIGFILE=/etc/privoxy/config_torX Type=forking PIDFile=/var/run/privoxy_torX.pid ExecStart=/usr/sbin/privoxy --pidfile $PIDFILE --user $OWNER $CONFIGFILE ExecStopPost=/bin/rm -f $PIDFILE SuccessExitStatus=15 # [Install] WantedBy=multi-user.target - Enable the X privoxy services:
systemctl enable privoxy_tor{1..4}.service
Squid
- Install Squid with:
apt install --no-install-recommends squid3 - Configure Squid in
/etc/squid/squid.conf:http_port 192.168.1.19:5000 http_port 192.168.1.19:5001 http_port 192.168.1.19:5002 # icp_port 0 # auth_param basic program /usr/lib/squid/basic_ncsa_auth /etc/squid/users auth_param basic children 5 auth_param basic realm Squid proxy-caching web server auth_param basic credentialsttl 2 hours # acl localnet src 192.168.1.0/24 acl PORT0 localport 5000 acl PORT1 localport 5001 acl PORT2 localport 5002 acl SSL_ports port 443 acl Safe_ports port 80 acl Safe_ports port 443 acl CONNECT method CONNECT # http_access deny !authenticated http_access allow localnet http_access allow localhost http_access deny !Safe_ports http_access deny CONNECT !SSL_ports http_access deny to_localhost http_access deny all icp_access deny all # never_direct allow all always_direct deny all # #PROXY cache_peer 127.0.0.1 parent 8100 0 no-query name=PROXY cache_peer_access PROXY deny !PORT0 # #PROXY_TOR cache_peer 127.0.0.1 parent 8101 0 round-robin no-query name=PROXY_TOR1 cache_peer_access PROXY_TOR1 deny !PORT1 cache_peer 127.0.0.1 parent 8102 0 round-robin no-query name=PROXY_TOR2 cache_peer_access PROXY_TOR2 deny !PORT1 cache_peer 127.0.0.1 parent 8103 0 round-robin no-query name=PROXY_TOR3 cache_peer_access PROXY_TOR3 deny !PORT1 cache_peer 127.0.0.1 parent 8104 0 round-robin no-query name=PROXY_TOR4 cache_peer_access PROXY_TOR4 deny !PORT1 # #PROXY_VPN cache_peer 127.0.0.1 parent 8110 0 no-query name=PROXY_VPN login=<username>:<password> cache_peer_access PROXY_VPN deny !PORT2 # cache_mem 1024 MB coredump_dir /var/spool/squid cache_dir aufs /var/spool/squid 1024 16 256 maximum_object_size 512 MB # refresh_pattern . 0 20% 4320 # pid_filename /var/run/squid.pid access_log none cache_store_log none cache_log none - Create Users to permit proxy access (password will be asked):
htpasswd -c /etc/squid/users <username>
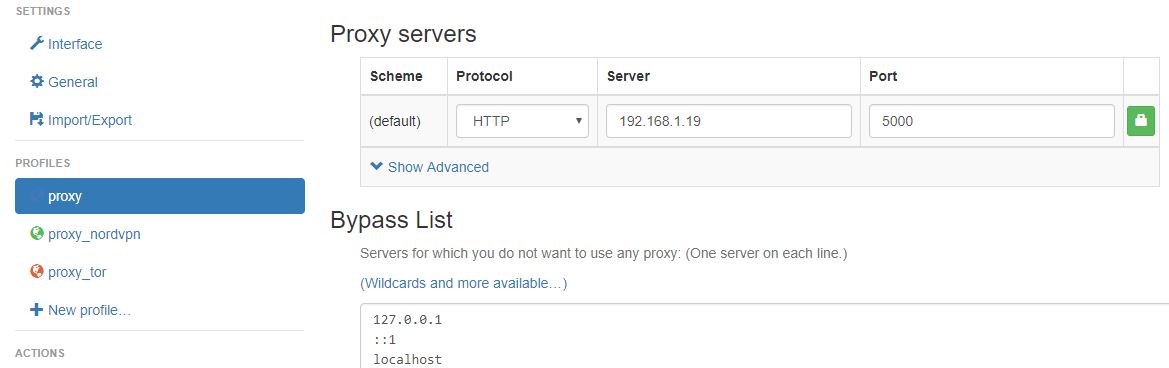
Configure Chrome
I Use the Chrome extensions ublock Origin to block ads and SwitchyOmega to easily switch between Proxy profiles:
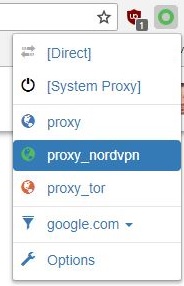
I created 3 profiles for ports 5000, 5001 and 5002: